Network Attached Storage (NAS) Clean‑ups [AKA: Shared Drive Clean‑ups]


Introduction

NAS stands for Network Attached Storage. It is also known by the campus community as the Shared Drive or the O:Drive. For more information on how to use NAS, connecting to NAS when off-campus, setting up a NAS folder, and the related costs, please see the ITS SharePoint site (internal).

As an academic institution, Dalhousie collects personal information about its students, faculty, staff, alumni, donors and other Dalhousie community members. All Dalhousie employees are responsible for managing administrative records in accordance with the Records Management Policy (section D.2). Administrative records that fall under Dalhousie’s outlined information security classifications standards must be managed in accordance with security clearance. Access to records within specific information security classifications, as well as records containing personal information, must be secure and accessible to authorized individuals. NAS is the most used approved storage repository across campus.

When improperly maintained, NAS folders can become cumbersome and difficult to navigate. Exponential content addition can cause stress on operational budgets, frustration when looking for records, and privacy breach risks. The Records Management Office (RMO) has created guidelines to assist units and individuals with maintaining and managing their content, including retroactive clean-ups, structure and retention outlines, naming conventions, and more.

Purpose

These guidelines are designed to guide units in reducing their NAS footprint and the associated risks by applying records management best practices to provide continuity of business operations while protecting and preserving records of enduring value.

Definitions:

Active Records: records in current use that need to be accessed frequently in the course of conducting office or departmental business. 

Disposition: the action taken with records that are no longer required for current business. Actions may include digitizing, duplicating, shredding, recycling or transferring to a storage site or Archives. 

Inactive Records: records no longer needed for operational use and ready for disposition.

Information Security Classifications: as outlined in the Information Security Classifications Standards -Public, Internal, Confidential, and Sensitive.

NAS: Network Assisted Storage. Also known as O:Drive or Shared Drive. Electronic storage created specifically for a Dalhousie University unit or group that is stored on Dalhousie University servers.

Personal Information: as defined by the Freedom of Information and Privacy Act (FOIPOP  Section 4.i.)

Unit: department, faculty, or subunit with a department or faculty.

University Administrative Record: a record (regardless of format or medium) supporting the administration of the University that is created, received, used or maintained by members of the University community in the course of activities undertaken on behalf of, or in the course of employment duties to, the University, including Electronic Records.  From Dalhousie University Records Management Policy

Guidelines

Note: These are guidelines only. The process will vary according to the unit and project size. Before starting any NAS clean-up please contact the Records Management Office for assistance in planning and throughout the initiative.

Support - The Records Management Office can provide services to support the clean-up and reorganization of NAS folders and should be consulted before starting any project.

Expectations - Units are responsible for managing content within their NAS folders and must have internal protocols that set out procedures and conventions agreed upon by the unit(s).

Phases

Before you begin - Determine who is going to do the work

Designate a person--or persons--responsible for monitoring and overseeing the clean-up project in all its phases; creating a communication plan; sending out communications; setting up meetings with internal units (when required); working with ITS, etc.

Once the clean-up project is complete, unit members will require training to properly maintain the NAS.

Phase 1 – Approval, Initial Communications, and Measuring a Starting Point

1.     Secure the approval and support of your unit’s senior leadership.

2.     Contact ITS for a report of:

  • The breakdown of the unit’s NAS storage footprint (measurement of space used)
  • Folder names and sub-folders (with last date modified)
  • Current access and levels– who has access to what folders (and what type of access). Review access levels immediately. Remove or adjust users access if required.

3.     Allocation of responsibility is important. Once senior leadership has granted support to this project their support needs to be communicated through the entire process.

Communication – Send communication to the faculty / department introducing the project and expectations.

4.     Secure a commitment and contact name from each group involved in the clean-up to assist with communications and tasks. The individual selected should have a solid understanding of the group’s administrative business activities.

  • Email unit contacts a communication plan:  clearly defined expectations and determination of how communications will be relayed from project teams, unit contacts to other group, and unit members.

Communication - Update units with unit contacts and project progress communication template found (Introduction Memo to Unit Template). Reassure all employees that they will still have access to the NAS content during the review stage. Let them know there will be regular communications and that their assistance will be needed to achieve and maintain positive results. Encourage individuals to do their own clean-up by getting rid of duplicates and transitory records.

5.     Realize this will take time. Clean-up projects can be overwhelming. Be patient--the Records Management Office is here to help.

  • TIP:  Request an information session from the Records Management Office at the beginning of the clean-up project to help communicate the need ad how to decipher what is a records vs a non-record

Phase 2 - Identifying the unit’s administrative business activities

Use DalCLASS to assist in highlighting all administrative business activities and functions of the unit

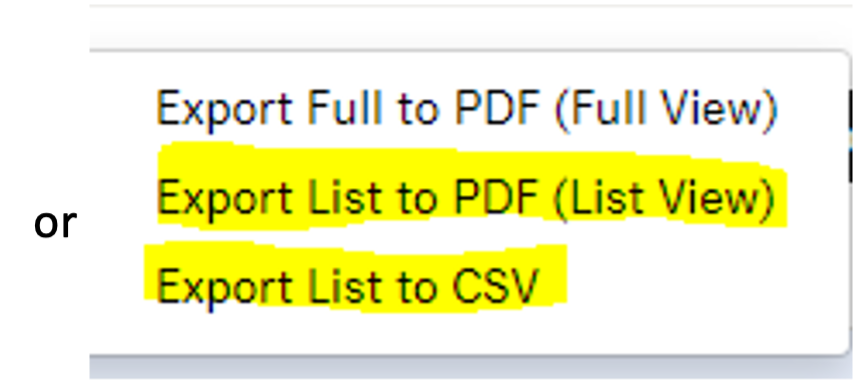
TIP: Click on ‘Export’ found under any DalCLASS record series. You can export the complete list of DalCLASS classifications to PDF or CSV format.


Select:

Use this list to identify:

  • the administrative business activities of your unit
  • whether your unit is a primary or secondary office
  • how long your unit is required to keep which records

TIP: The Records Management Office can assist in facilitating this process.

Check-in: NAS report – Request a new report to check on clean-up status or progression. Compare to the initial one (from Phase 1).

Communication: Send out an update on milestones and progress.

Phase 3 - Identify Access levels

Once you identify the administrative business activities of your unit you can break down access requirements (which units require what kind of access to which records). This will help to outline the NAS folder structure.

Note: The NAS is structured by ITS and user groups access is set two folder levels deep. Consider this when determining how folders will be structured for appropriate user access.

TIP: Create your own table or use the NAS Clean-ups - User Groupings Spreadsheet Template. These are found under Forms and Templates on the Records Management Office Resources website.

Hint: There may be more than one user groups with access to the same DalCLASS numbers. These will be different access groups.

Phase 4 - Initial Review of NAS folders

Once you have an outline of your unit’s functions and who requires access to what, review the NAS folders. Use this opportunity to:

  • delete empty folders
  • delete duplicates and transitory documents
  • note documents in unrecognized formats (How old is the document? Do you need a program to open it?)

Communication: Encourage employees to review folders they access regularly and delete duplicates, transitory and redundant information, and to move personal documents to their personal OneDrive. Give them a deadline and send a reminder. Request senior leaders to communicate their support for these tasks. Motivate and reward individual engagement and results.

TIP: Book a session with the RMO on identifying records and non-records.

Phase 5 - Create a structure

Here the new folder structure will start to take shape. You may have started this in Phase 2 when outlining DalCLASS numbers and unit functions. This is the time to apply user groups.

  • Create a spreadsheet of Level 1 and 2 folders and identify groups responsible for the folders.
  • Set up a meeting with contacts, identified in Phase 1, to discuss the folders and their content.

o   Initial meeting

  1. Discuss roles and expectations
  2. Review User Access Groups
  3. Review NAS folder(s)
  4. Delete empty folders
  5. Set parameters for identifying records; duplicate records; transitory records; and indeterminate records (‘not sure’). (See: Transitory Records) use wording from introduction memo and build on it.
  6. Encourage deletion of empty folders
  7. Educate NAS users about duplicate and transitory records and encourage their deletion when identified
  8. Formats – what percentage of documents are not readable? Discuss how these will be handled.
  • Examine the folder levels to ID DalCLASS numbers and look at related DalCLASS folders and files. Identify regularly used documents, open projects, and closed or older documents.
  • Makes notes in your spreadsheet for that unit.
  • Set up regular progress meetings.

Check-in: NAS report – Request a new report to check on clean-up status or progression. Compare to the initial report (from Phase 1&2).

Communication: Email unit with follow-up on Phase 4 progress and next steps. Highlight qualitative numbers from report and unit achievements.

Phase 6 – Naming Conventions

Naming conventions are rules that support the consistent filing of folders and files and enable efficient information retrieval. “File names” are the titles listed in the file directory that we assign to new files when we save them for the first time.

  • Benefits to a defined naming convention:

o   Creates clarity and consistency for records

o   Reduces ‘mood based’ naming

o   Quickens searchability of documents

o   Reduces duplication

o   Simplifies reading and sorting in the NAS

  • Determine a naming convention for folders and files. Consider how the unit currently names and searches for documents to inform a structure that identifies which documents are records. If a new naming convention proves unnecessary, you should document the currently used naming convention.
  • Set standards for how the unit will type out regularly used formats such as

o   Dates format: YYYY-MM-DD. Example: 2020-03-31

o   Acronyms

o   Names

o   Version vs Drafts vs Finals

  • Document these standards and make them available to unit employees. Use them when training new employees.

Note: File names and paths should be meaningful, relevant and brief—no more than 255 characters (the 255 starts at the characters O: in the file pathway and includes spaces

  • TIP: NAS sorts first chronology, then alphabetically
  • TIP: Biggest to most specific
  • TIP: Focus on the active records – DO NOT go back and rename everything! Consider active records vs older records and determine how to move forward with naming conventions.

Phase 7 – Moving and Identifying Records for Disposition

Once you have outlined a structure, consult with ITS to create a test structure in NAS to identify and move records without disturbing the active NAS structure. Grant read-only access to stakeholders and request feedback as the project progresses.

Inactive records are no longer required to be retained in the unit and are deemed ready for disposition. As such, there is no reason to rename them or move them into the new folder structure.

  • Create a ‘ready for destruction’ folder with corresponding DalCLASS numbers
  • Create a ‘ready for archival transfer’ folder with corresponding DalCLASS numbers

Once records identified for disposition are in the NAS, they are subject to records disposition procedures.

  • Communication: Email unit following up on Phase 5 progress and next steps. Highlight qualitative numbers from report and unit achievements.

See: Submission of Records Disposition Documentation

  • Communication: As you work through dispositioning records, send out celebratory emails and identify those employees who have helped the process.
  • Once complete, celebrate! This was hard work and time-consuming – that deserves a party!

Phase 8 - Continuing Maintenance

Now that the hard work is complete, you don’t want it to be in vain. Continuing maintenance must be part of the unit’s workflow to ensure that records are retained no longer than they should be, user groups are up-to-date, naming conventions are adhered to, and the NAS does not turn into another dumping ground for random stuff.

Allocate Responsibility

Talk with senior leadership about how this will look moving forward. Many hands make light work and expectations need to communicated. Just because the clean-up is done you don’t want to have to go through this in another year or two (or three or four…).

Document:

  • In-house processes and how they will be applied
  • Create a cheat sheet for when DalCLASS numbers should be reviewed and applied to folders
  • Expectations of:

o   Unit commitment

o   Senior leadership

o   NAS administrative leader(s)

o   All unit employees

  • Create schedules

o   Folder review should reflect DalCLASS retention schedules (e.g., financial records are reviewed each fiscal year)

o   Regular reports from ITS to monitor adherence to procedures (e.g., naming conventions and retentions)

Remember we are help to help. The Records Management Office (subject line: NAS In Clean-up inquiry) is available to provide assistance with NAS clean-ups.